Like everyone else, I love to hate Microsoft. It’s easy to forget how much that company has done for the growth of computing. But, having given MS its due, I’m still looking forward to the day I can shift all of my computer activities to Linux. Photography makes up a lot of what I use my computer for, and converting my photography workflow to Linux is the biggest challenge. One speed bump I’ve now gotten over is setting up a dual display system. I’ve had it for years with Windows, but only recently dove in and got it working on my Linux system.
As with many things in Linux, getting dual monitors working is not so much difficult as time consuming, mainly due to the requisite hunting through open source documentation, proprietary video card files, and numerous blog and forum postings to piece together what is needed for a given Linux distribution and video card combination. Now that I’ve done it, I’m putting it here so that folks with my distro (PCLinuxOS) and video card (Nvidia GeForce 8500 GT) can skip the hard part. You should be able to apply it to other video cards and Linux distributions. I’ve tried to make this step by step, but have to assume you know the basics of getting around your Linux system.
So, first off, go to Synaptic (the package repository) and make sure you have the appropriate Nvidia driver. In my case, this was “nvidia_180.xx”. Install it. Exit Synaptic.
The next step is to modify your xorg.conf file. “Huh?”, you say. That’s the file that configures your video output (X Window). We’ll save the original xorg.conf file; create a new xorg.conf based on your second monitor; then cut the important stuff out of this second file and paste it back into the first one. It requires that you use a terminal (like Konsole). Open the terminal and make yourself a superuser (type su and enter the root password). Then navigate to the directory where xorg.conf lives and make a backup copy of it, with the following commands:
[user@localhost home]$    cd  /etc/X11/

[user@localhost X11]$    cp  xorg.conf  xorg.conf.original
[user@localhost X11]$ cp xorg.conf xorg.conf.original
Now, if you mess up, you can always get back to your starting point (xorg.conf.original). In fact, before you do any of this, you might want to back up your entire system. When messing with xorg.conf, you can really screw things up.
UPDATE Sept. 2010
There’s an easier way! While fooling around installing PCLinuxOS 2010, I’ve come across a simple step that avoids much of the work below. If you want to learn a little about the xorg.conf file, go ahead, keep reading. But, if you just want to get things done, skip the painful part and click down to here.
…………………………………………………………………………………….
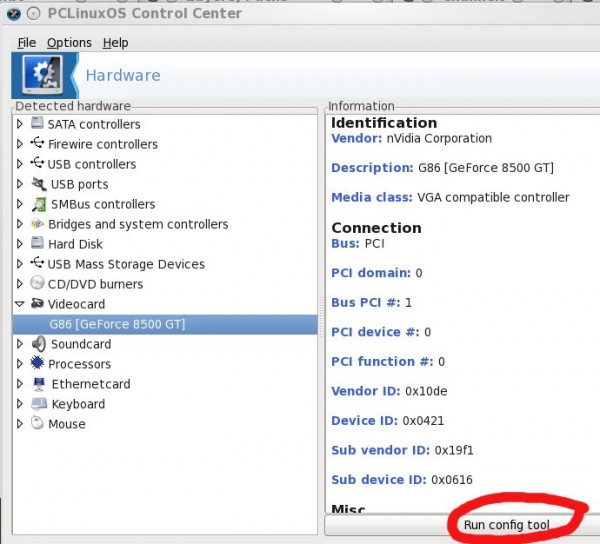
At this point, you need to reconfigure the system so it will create an xorg.conf for your new (second) monitor. You might not even have to plug it in. Just open the PCLinuxOS Control Center, choose Hardware -> Browse and configure hardware:
Then choose Videocard -> GeForce 8500 GT (or whatever card you’ve got – but it needs to have “TwinView” capability); hit “Run config tool” (bottom right):
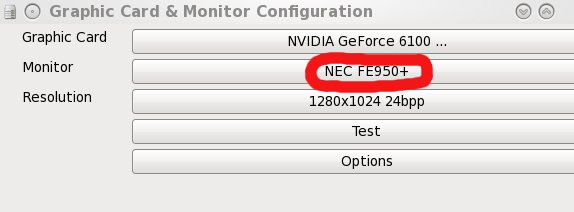
Click on the monitor setting button:
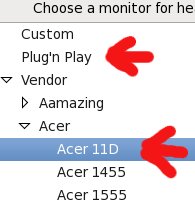
You might be able to choose your specific monitor by vendor. If it’s not listed, power down, plug in the second monitor and turn it on, turn off the first monitor and reboot. [For the record, my first monitor (CRT) is plugged into the VGA port; the second (LCD) is in the DVI port.] Go back to the Config Tool and try “Plug’n Play”. Whatever works. Save the new settings. Exit out of the control centre.
Go back to the terminal program. Rename your new xorg.conf file (since we only be using it for spare parts):
[user@localhost X11]$ cp xorg.conf xorg.conf.second
Reinstate your original xorg.conf file:
[user@localhost X11]$ cp xorg.conf.original xorg.conf
and then type:
[user@localhost X11]$ cat xorg.conf.second
which will display the second file in your terminal program, so we can cut out the pieces we want.
Now, start up a text editor (like Kwrite) and open /etc/X11/xorg.conf.
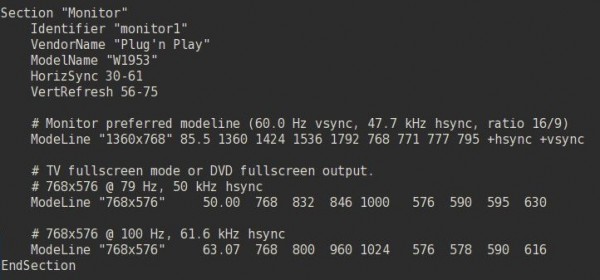
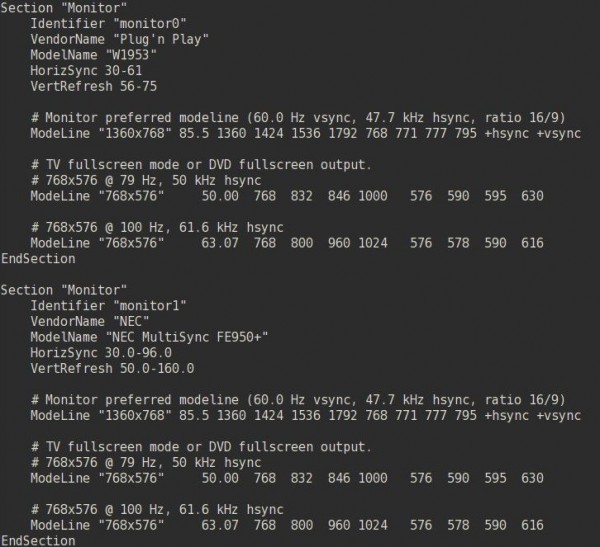
Find the two sections shown below in your xorg.conf.second file, copy them from the terminal and then paste them in below their equivalent sections in xorg.conf (in your text editor):
and
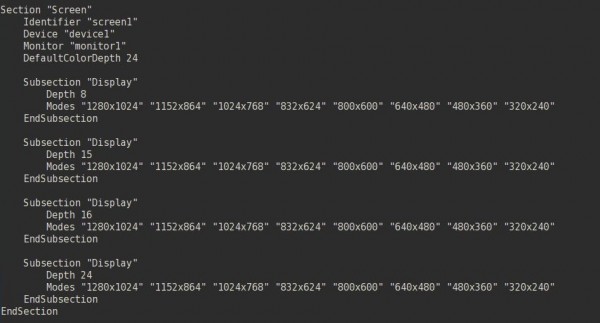
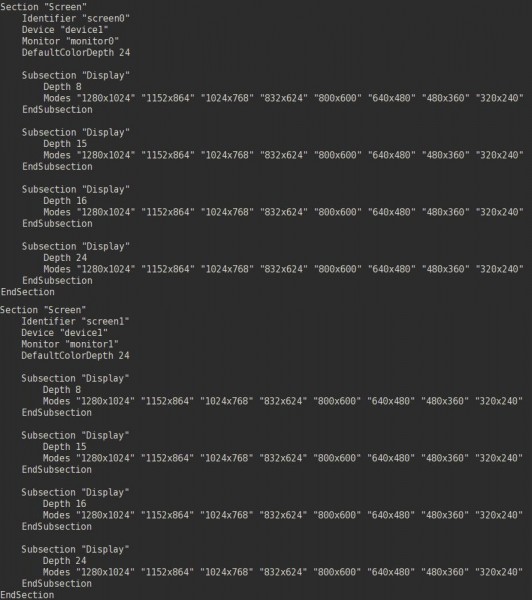
Now your xorg.conf file has two monitor sections and two screen sections. You will have to edit the Identifier and Monitor fields of these sections to reflect this. You end up with:
and
While the file is still open in your text editor, there are a couple of other things to change.
Find the line
Disable "dri"
and put # in front of it (that turns the line into a comment). I don’t know why, but Nvidia doesn’t like it. Add these lines to the Device section:
Option "TwinView"

Option "MetaModes"   "{list of metamodes}"
Option "MetaModes" "{list of metamodes}"
where the metamodes describe your monitor resolutions (see Nvidia’s help files). If you know what you’re doing, you can get fancy here.
Also in the Devices section add:
Option "SecondMonitorHorizSync" "{hsync range(s)}"

Option "SecondMonitorVertRefresh"   "{vrefresh range(s)}"
Option "SecondMonitorVertRefresh" "{vrefresh range(s)}"
which describe the second monitor.
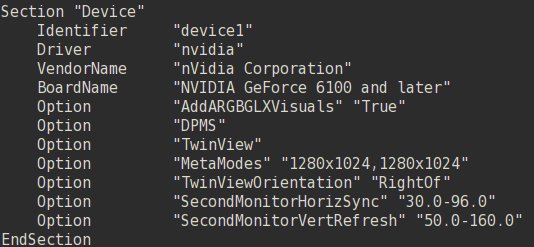
The result should look something like this:
Now you can save xorg.conf and exit the text editor.
UPDATE Sept. 2010
Instead of the endless, mind numbing steps above, you can just make one little change to your xorg.conf file.
Be sure you are still in superuser mode. Start up a text editor (like Kwrite) and open /etc/X11/xorg.conf. Scroll down until you find the Section “Device”. In it, you’ll find a line that reads ‘Option “DynamicTwinView” “false”‘. Change “false” to “true”. Save the change and that’s it!
…………………………………………………………………………………….
You’re almost there. Plug in both monitors and reboot. Start up the terminal, become the superuser (su), and type:
nvidia-settings
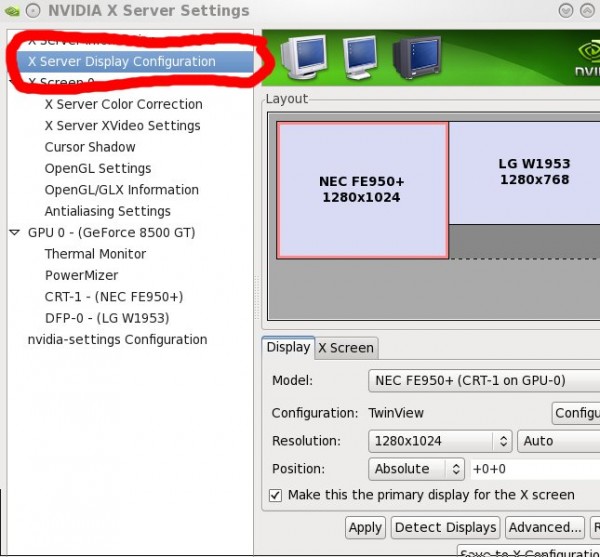
This will start up the nvidia control program. Explore it. The most important section for our purposes is the second from the top on the left, labeled X Server Display Configuration:
If everything has worked, once you configure the two monitors here, you’re done! If the two monitors aren’t in the correct layout (e.g. the left monitor should be on the right, and vice versa), you can play with the “TwinViewOrientation” option (see the Nvidia help file).
Two final notes:
i) I’m not an X-Window expert. Some of the steps above are likely unnecessary or redundant. I do know that just running the nvidia-settings command, without making any changes to xorg.conf first, doesn’t work. This is the simplest way I know to set up a baseline xorg.conf file.
ii) Using TwinView, you will only be able to colour calibrate one of the two monitors. That’s fine with me. I use the calibrated monitor to display images, the uncalibrated one for palettes, web browsing, etc. It’s actually nice to have an uncalibrated monitor available. You can drag an image over and see what it’ll look like when the average web surfer views it (on his or her uncalibrated monitor).
More references, if you want to dig deeper:
http://www.digitalcheese.ca/wordpress/index.php/2009/01/20/setting-up-dual-or-multiple-monitors-in-linux/
http://www.yolinux.com/TUTORIALS/LinuxAndDualMonitors.html
http://www.ubuntugeek.com/dual-monitors-with-nvidia.html
If anyone can provide some hints to make this easier, I’d be glad to hear them.

I have two different amd boxes, both use Sam-sung 17 inch (710) one a Ubuntu 9.04, the other a 9.10 both are running under Gnome, one has a ATI 3800 series card and the other a Nivida. I was able to set mine up easier. I go Systems, Preferences, Display, UN check mirror screens, it see’s the other monitor, a window pops asking, this is not set up in Virt. yet ……..do you want to ….Yes, a few seconds later my twin monitors show the background across both monitors. From that moment on I can move any folder/object back and forth between both monitors. Any additional changes I go to Appearances/background and make them. It also shows the activity for both monitors in the tool bar below. Personally If I had to go through what you did to get two monitors to work together, I’d have to think twice about it. If Synaptic & restricted drivers can’t fill my needs, its not worth the effort to me. The new ATI 5570 series is supporting Eyefinity that will support up to three monitors
It would be good to emphasize that X.org provides a standard and very simple interface for handling multiple monitors, known as RandR. If you use any properly-compliant driver – which includes the main open source drivers, ‘intel’, ‘radeon’, ‘nouveau’ and ‘radeonhd’ – you can configure multiple monitors entirely graphically using gnome-display-properties , or with a simple command line tool (xrandr), or in xorg.conf following the instructions at http://wiki.debian.org/XStrikeForce/HowToRandR12 .
It’s only drivers which implement proprietary systems – like ‘nvidia’ and ‘fglrx’ – which require non-standard configuration like this.
@Tom: That sounds much more civilized. I’m not sure what the secret is – ubuntu, gnome, the card drivers, or a combination. There is a similar sounding process in kde on pclinuxos, but the options are all greyed out. What nvidia card are you using?
@Adam: I had looked into xrandr, but didn’t pursue it. It didn’t look that much simpler and didn’t seem quite as versatile as twinvue. In retrospect, my opinion might be different. I’ll have to take another look.
It’s too bad the nvidia-settings application doesn’t just work (without the user fooling with xorg.conf). How hard could that be?
the change of the xorg.conf unlocked my dual display option, thanks for your help
Glad to know it was helpful.
I’ve followed the described procedure, edited xorg.conf and it workd like a charm, from the first reboot. Thanks for the tutorial!
Thanks for the feedback, Alex.